
Skill Level
Beginner
Time to Make
1 hour

How to Make
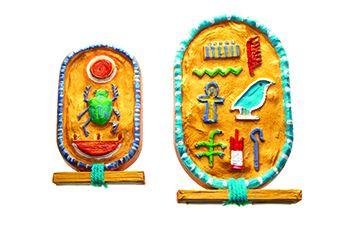
- First, plan the design for your cartouche by drawing around the plastic container onto paper as a guide for the shape. Draw a border then draw the symbols in the middle.
- Press a 1cm layer of Das clay into the base of the container. Press the clay with your fingers to make the surface as flat as possible, or press the base of a jar or a lid onto the clay. Use the end of a felt pen or pencil to press a border into the clay to represent the rope tied around the edge.
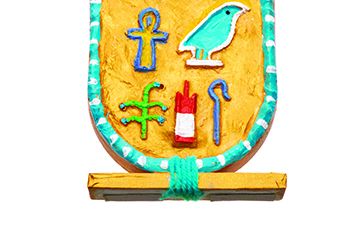
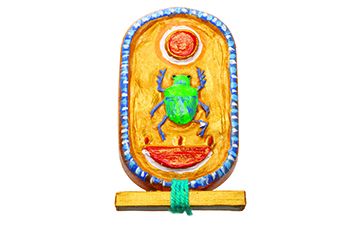
- Press the cartouche symbols into the surface of the clay using modelling tools, strips of thick card or use your fingers, depending on the design. Circles can be made with pen or glue stick lids. See tips. If the impression doesn’t look clear enough in the clay, press over the top with a modelling tool to make the lines deeper. Keep the shapes bold and not too fiddly or thin. Allow the clay to dry overnight to harden.
- Measure 3 parts of plaster powder into a mixing bowl then add 2 parts of water. Mix the plaster into a creamy consistency. Wearing disposable gloves makes this easier so you can smooth out any lumps in the plaster mix. Follow instructions on the packaging for mixing plaster. As a rough guide for a 500g margarine or butter container, use a small yoghurt pot for measuring 1 part. For a larger container, use a paper cup to measure 1 part.
- Carefully pour the plaster mix over the clay, gently tipping the container so the base is evenly covered. Tap the sides to remove any air bubbles then leave to dry for an hour or so.
- Press the top of the plaster to check it has set, then carefully squeeze the sides of the container to release it. If the clay layer hasn’t fully hardened, the plaster cast may come out still attached to the clay, if so, leave both layers stuck together overnight to dry out before separating them. If there are any areas where the clay has stuck to the plaster, scrub the surface of the hardened plaster cast with an old toothbrush and water to remove any unwanted material. Leave the plaster to thoroughly dry out before painting.
- Paint the background of the plaster cast gold then paint the symbols, using one colour at a time, wait for the paint to dry before applying the next colour. Use a sponge dabber to add a second colour to highlight the relief patterns.
- For the cartouche base, cut 2 strips of corrugated card from a box; for a cast made in a 500g container, make the 2 strips approx 2cm x 8cm, for a larger container, make them 3cm x 12cm. Hold the 2 strips together and wrap with masking tape, then paint gold. Leave to dry. Add a second coat of paint if necessary.
- Rub the base of the plaster cartouche with sandpaper to flatten it slightly. Check it stands upright then glue it onto the base. Glue small pieces of wool at the bottom of the cartouche to represent the tied rope.
Step 1
Step 2
Step 3


Share
×You can copy this link into emails, text messages or post on social media.
Share now