

How to Make
- Using the template, cut out the gift tag shape from card and hole punch a hole at the top.
- Then stick the Christmas shape templates onto cardboard.
- Cover the cardboard with super tacky glue. Make sure the glue isn’t too thick as you won’t be able to see your design underneath.
- Follow the lines of your drawing with the cotton string.
- Allow the glue to dry and then cut around the string design.
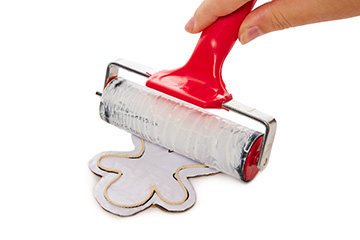
- Squirt a blob of paint into a tray. Roll one of your rollers into the paint, until the roller is covered in the paint.
- Roll the paint onto the string design until it is completely covered.
- Place your string design face down on the gift tag. Use a clean roller to roll onto the back or press down with your hand – this applies pressure to create the print. Peel the string design off the card and leave the print to dry.
- Repeat for each design.
- When the prints are dry, thread ribbon through the hole at the top of the gift tag.
Step 1

Step 2
Step 3


Share
×You can copy this link into emails, text messages or post on social media.
Share now